EMBEDDED ADVENTURES: CONNECT THE WORLD AROUND YOU
Tutorials in this section:
DSP-0401B Alphanumeric Display with Arduino
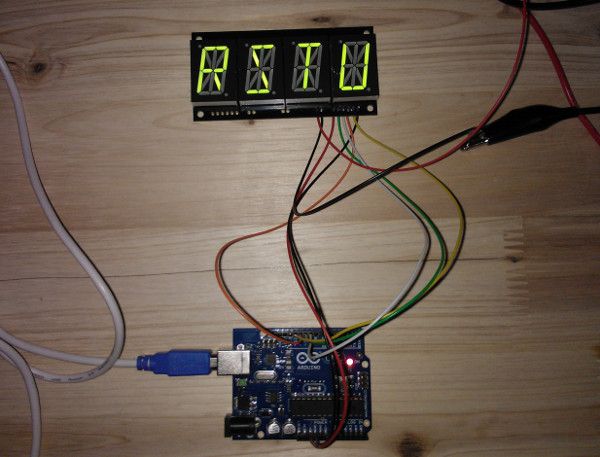
Connections to the Arduino board
If you're working on a breadboard, solder breakaway male pin headers to JP1 and JP2. You can also use flying wires as shown in the example photo. I find these easier to work with in some situations, and they give you more options regarding connecting the display to other equipment. I'm using 0.2mm stranded core wire here, and with the ends tinned they fit quite neatly into the female headers of the Arduino board. Make the connections as follows:
GND - Arduino ground pin
CLK - Arduino pin 11
SIN - Arduino pin 12
CLK - Arduino pin 9
LAT - Arduino pin 10
VCC - Arduino 5V pin
LED_SUP - External power supply positive
GND - External power supply negative
We're not going to use the other headers in these examples, so you can either solder headers to them for future use, or leave them as they are.


Ardino side of the connections
Important power supply considerations:
The display board is capable of drawing a lot of current when run at high brightness with lots of segments lit. While the logic-side of the driver ICs can quite easily run from the Arduino's 5V output pin, the onboard regulator (and indeed, the USB port on your computer) may not be able to cope and it's possible to make both of them very unhappy. Windows will most likely shut down the USB port as soon as it reports a problem, but in the worst case scenario you may cause damage to your equipment.
For this project I'm using a bench power supply set to 6V to power the LEDs, and with all segments on at full brightness, the current draw was in excess of 600mA! Using PWM dimming as shown in the example code will reduce this to a more manageable <300mA peak, with the display still nice and clear. If you don't have a bench supply, 6 decent AA batteries (preferably lithiums) will do just fine, and gives you plenty of headroom before the voltage drops too low to run the LEDs.
16 Segment character table:
Driving the DSP-0401B is no more difficult than sending data to a shift register like the 74HC595. In fact, at the logic level we'll be using it in exactly the same way. The hard part is figuring out WHAT data to send it. In my DSP-0801 tutorial I have already covered the process of working out each character using both the Embedded Adventures product datasheet, an online hex calculator and good old-fashioned paper and a pen. If you want to see how things are done "the hard way", more details can be found there. For now, let's dive right in.
The letters A-Z in upper-case will be stored in memory like so:
const word uppercase[26] = { 0x3CB8, 0xBCAC, 0x84AC, 0xAD85,
                             0x94BC, 0x14B8, 0xB4AC, 0x3838,
                             0x8585, 0xA80C, 0x4238, 0x802C,
                             0x2A69, 0x6868, 0xACAC, 0x1CB8,
                             0xECAC, 0x5CB8, 0xC4C4, 0x581,
                             0xA82C, 0x22A,  0x692A, 0x4242,
                             0x241,  0x8686 };
And the same again for numbers 0-9:
const word numbers[10] = {
                         0xAEAE, 0x2A00, 0x9C9C, 0xBC94, 0x3830,
                         0xB4B4, 0xB4BC, 0x2C80, 0xBCBC, 0xBCB4 };
Each element of the array is 16 bits, so we'll use the data type "word". For our purposes, these values themselves will not be changed, only moved around in memory. So let's declare them as constants too. Keeping the numbers array in ascending order, with 0 at the beginning rather than after 9, makes it really simple to get numbers generated by our program onto the display (see example program 2).
Both arrays are global - they can be accessed by any part of our program. Driving the display requires no additional code libraries taking up valuable flash memory space, so the resulting compiled code size is quite small.
As a learning exercise, why not try making some special characters, or if you're feeling really ambitious, a lower-case character set!
Example 1: Scrolling text demo
Download: dsp0401b_test.c
Example 2: Counter/Timer
Now we've covered the basics of getting something on the display, let's look at something a bit closer to a "real-world" application - taking an actual number generated by a program and displaying it. There are countless applications where this is required, and once learned it can be dropped in to many other projects with only minor modifications.
This program basically performs two tasks. Keep track of how much time has passed since being switched on, and update the display after a certain length of time (in this case, one second). The second task is the hard part, as there's no magical relationship between a number in RAM, and a number on the display, so we need a way to translate between the two. This is accomplished in two parts:
1. Splitting up an integer into four separate digits.
Suppose we have an integer value we want to push to the display, for example 1234, and we need to split this into thousands, hundreds, tens and units. We can do this using division, and the modulo (%) operator as shown below:
Units: 1234 % 10 = 4
Modulo gives us the remainder, so 1234/10 = 123 remainder 4
Tens: 1234/10 = 123.4 (truncated to 123, integers can only store WHOLE numbers)
123 % 10 = 3
Hundreds: 1234/100 = 12.34 = 12, 12 % 10 = 2
Thousands: 1234/1000 = 1.234 = 1
Following along with the example code, you can see we create variables to store all these results, plus an extra one to store our working-out.
2. Displaying the number.
When we created our character set, the numbers were in order from 0 to 9. So if the value held in our "units" variable is 4, this will point to array element [4], which actually holds the segment pattern for the number 4! This will work no matter what the individual digit's value happens to be, and saves us an awful lot of switch/case statements which can be very time-consuming to type. If we want to change the way a digit is displayed, for example a more stylish 7 with a diagonal tail instead of "calculator-style", we only have to change one value in one line of our code without worrying about breaking something elsewhere.
Let's look at the example code and see it in action.
Download: dsp0401b_test_counter.c